
Consumer Unit Replacement: Four Critical Considerations Before You Start

- Technical review: Thomas Jevons (Head of Training, 20+ years)
- Employability review: Joshua Jarvis (Placement Manager)
- Editorial review: Jessica Gilbert (Marketing Editorial Team)
- Last reviewed:
- Changes: Updated with Amendment 2 BS 7671 requirements and current Part P notification procedures
You’ve been told your consumer unit needs replacing. Maybe an electrician recommended it during an EICR. Maybe you’re selling a house and the surveyor flagged your old plastic fuse box. Maybe you just know it’s ancient and want peace of mind.
Whatever the reason, here’s what nobody tells you upfront: replacing a consumer unit isn’t swapping an old box for a new one. It’s assessing your entire electrical system to determine whether it can safely support modern protective devices.
The physical swap might take a few hours. The testing, verification, and potential additional work can take considerably longer. And if your house has wiring from the 1970s or earlier, discovering what needs addressing before the new unit can be commissioned might be the expensive part.
This guide breaks down the four critical considerations that determine whether a consumer unit replacement is straightforward or complicated, what modern standards require, why the whole-system approach matters, and what homeowners and landlords actually need to understand before getting quotes.
Why Consumer Unit Replacement Isn't a Simple Swap
The consumer unit (often still called a fuse box, though modern ones don’t contain fuses) is the central hub that distributes electricity from your main supply to every circuit in your home. It houses the protective devices that prevent overloads, detect faults, and cut power during dangerous situations.
Replacing it involves far more than disconnecting the old unit and connecting a new one. Here’s why:
Modern protective devices are more sensitive than old fuses
Old-style rewirable fuses or cartridge fuses allow faults to persist for years without tripping. They’re designed to prevent catastrophic overloads that could start fires, but they won’t detect smaller issues like earth leakage or minor insulation degradation.
Modern consumer units contain RCDs (Residual Current Devices) and RCBOs (Residual Current Breaker with Overcurrent protection) that detect faults in milliseconds. They’re far more effective at preventing electric shock and fire, but they’re also far more likely to trip if pre-existing problems exist in your circuits.
When you install a sensitive RCD onto a circuit with slight earth leakage that’s been present for decades, the RCD will trip immediately. The fault was always there. The old fuse just couldn’t detect it. Now you need to fix the underlying problem before the new consumer unit will stay operational.
The unit relies on your entire electrical system’s integrity
A consumer unit cannot protect your home if the earthing system is inadequate. It cannot prevent electric shock if bonding to gas and water services is missing or undersized. It cannot safeguard circuits if the wiring insulation has degraded to the point where faults occur regularly.
Think of it this way: installing a state-of-the-art consumer unit onto faulty wiring is like fitting advanced brakes to a car with worn tyres. The brakes might be excellent, but they can’t compensate for the fundamental safety issue elsewhere in the system.
Legal verification requirements exist
Under BS 7671:2018+A2:2022 (the UK wiring regulations) and Building Regulations Part P, the electrician replacing your consumer unit must verify that the installation it serves is safe. They cannot legally certify the work if dangerous conditions exist.
This isn’t optional or a way to upsell additional work. It’s a regulatory requirement that protects both you and the electrician. If they install a new consumer unit without testing the circuits, bonding, and earthing, they’re breaking the law and potentially creating a situation where the new protective devices cannot function as designed.
Understanding why qualified electrical professionals command higher rates becomes clearer when you recognize the legal responsibilities, testing requirements, and system-wide assessment involved in work that appears simple on the surface.
Consideration 1: The Condition of Your Existing Circuits
Before any physical work begins, an electrician needs to assess whether your current wiring can handle modern protective devices. This isn’t about the age of the wiring alone. It’s about its condition, capacity, and compatibility with BS 7671 requirements.
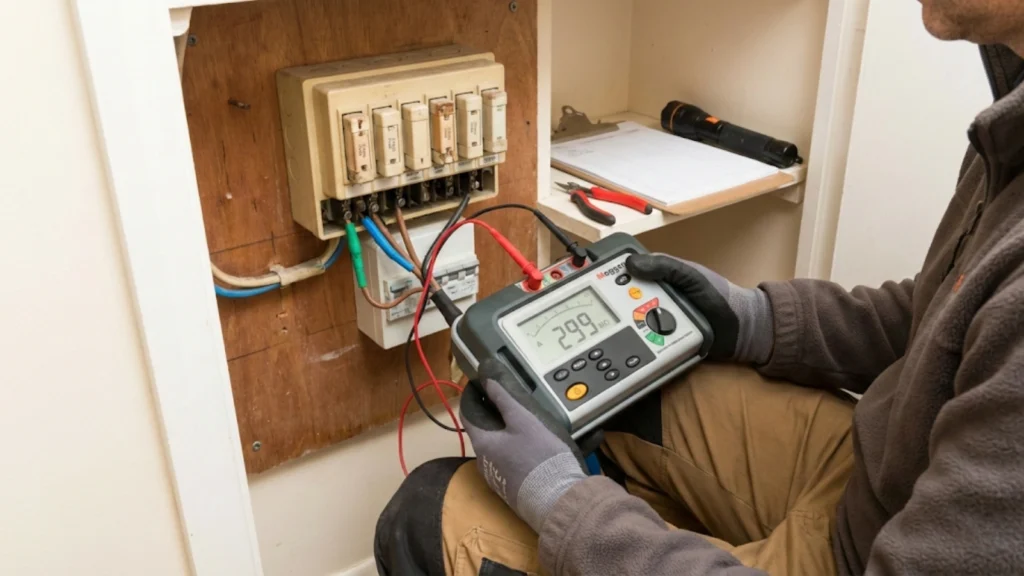
Insulation resistance testing reveals hidden problems
Electrical cables have insulation preventing current from leaking where it shouldn’t. Over decades, this insulation degrades due to heat cycles, environmental exposure, mechanical damage, or simply age. Small amounts of current start leaking to earth, creating potential shock risks.
Old fuses wouldn’t detect this. Modern RCDs will. An insulation resistance test (performed with a megger) measures how well your cables still insulate. If results fall below acceptable thresholds (typically 1 megaohm or higher depending on circuit type), those circuits need remedial work before a new consumer unit can be commissioned.
This is where costs escalate unexpectedly. If three of your circuits show poor insulation, you’re looking at rewiring those circuits or accepting that they cannot be protected by the new consumer unit (which creates compliance issues and safety concerns).
Circuit capacity versus modern demand
Houses built in the 1960s-1980s typically have far fewer circuits than modern standards recommend. You might have one circuit serving all downstairs sockets, another for upstairs sockets, and separate circuits for lighting and the cooker.
Modern guidance under BS 7671 recommends more division. Kitchen sockets often warrant their own circuit due to high-demand appliances. Dedicated circuits for items like electric showers, EV chargers, or home office equipment are increasingly common.
If your existing circuits are overloaded (running too many appliances through undersized cables), the new consumer unit won’t fix that. The protective devices will trip frequently because the circuit genuinely cannot handle the load you’re placing on it.
This doesn’t always require complete rewiring. Sometimes adding additional circuits during the consumer unit replacement addresses the capacity issue. But it does mean the quote for “just swapping the board” becomes more complex once actual assessment happens.
Cable identification and documentation
In older installations, circuits often aren’t clearly labeled. Cables might disappear into walls with no indication where they terminate. Some might be dead ends from previous alterations. Others might serve purposes that aren’t immediately obvious.
Before commissioning a new consumer unit, every circuit connected to it must be identified, tested, and documented. This takes time. If your installation lacks any records and has decades of DIY modifications, expect this phase to be time-consuming and potentially revealing of issues requiring attention.
The condition of existing circuits determines whether a consumer unit replacement is a few hours of work or several days involving remedial work. Electricians can’t know which category your house falls into until they test. This is why quotes often come with caveats about “subject to test results” or “assuming circuits are in satisfactory condition.”
Consideration 2: Earthing and Bonding Requirements
Earthing and bonding form the safety foundation your consumer unit relies on. Without proper arrangements, the protective devices inside the new unit cannot function correctly during fault conditions.
What earthing actually does
In simple terms, earthing provides a low-resistance path for fault current to flow safely into the ground. When a fault occurs (for example, a live wire touching a metal appliance casing), current flows through the earth path back to the supply transformer. This imbalance is what RCDs detect, causing them to trip and disconnect power in milliseconds.
If your earthing arrangement is inadequate (undersized earth conductor, poor connection to the main earthing terminal, or TT system with insufficient earth electrode), fault current cannot flow properly. The RCD might not trip, or it might trip too slowly, leaving time for electric shock or fire to occur.
Bonding prevents dangerous voltage differences
Bonding connects all extraneous conductive parts (metal pipes, structural steelwork, central heating systems) to the main earthing terminal. This ensures everything in your home sits at the same electrical potential during a fault, preventing situations where touching a tap and a radiator simultaneously could complete a circuit through your body.
Older houses often lack proper bonding. Gas and water services might not be bonded at all, or they might use undersized conductors that don’t meet current BS 7671 requirements (typically 10mm² minimum for main protective bonding).
"The main earthing terminal is where all circuit protective conductors, bonding conductors, and the main earth connect. If that arrangement doesn't meet BS 7671 requirements for conductor sizing or bonding to extraneous conductive parts like gas and water services, the new consumer unit's protective devices cannot operate correctly during faults. You're building safety features on an unsafe foundation."
Thomas Jevons, Head of Training
Common earthing and bonding issues found during consumer unit replacements:
Missing or undersized main protective bonding to gas meter and water stop tap. Regulation 411.3.1.2 requires bonding of extraneous-conductive-parts, and missing bonding is a common C2 (potentially dangerous) observation on EICRs.
Supplementary bonding in bathrooms often missing in pre-17th Edition installations. While not always required under current standards if RCD protection exists, its absence combined with other issues can create unsafe conditions.
Inadequate earth electrode resistance on TT earthing systems. If your property uses a TT system (common in rural areas without mains earth from the DNO), the earth electrode must achieve sufficiently low resistance (typically under 200 ohms). Deteriorated electrodes often exceed this, requiring replacement before the new consumer unit can rely on them.
Earth continuity breaks due to plastic pipe replacements. Older installations sometimes relied on metal water pipes for earthing continuity. When sections get replaced with plastic during plumbing work, the earth path breaks. This needs correction before commissioning a new consumer unit.
The cost impact
Upgrading earthing and bonding typically costs £200-£600 depending on complexity and accessibility. Running new bonding conductors to a gas meter in the front garden costs more than bonding a water stop tap in the kitchen under the sink. If an earth electrode needs replacing on a TT system, expect £400-£800 including excavation and testing.
These aren’t optional extras. They’re regulatory requirements that must be addressed before the consumer unit replacement can be certified compliant.
For electricians specializing in commercial or industrial installations requiring complex earthing arrangements, advanced training in areas like building electrical management systems provides the technical knowledge needed to design and verify protective measures in larger-scale electrical infrastructure.
Consideration 3: Modern Standard Requirements You Cannot Avoid
BS 7671:2018 with Amendment 2 (published 2022) introduced several requirements that affect every consumer unit replacement. These aren’t recommendations. They’re regulatory standards that must be met for legal certification.
RCD or RCBO protection for socket outlets
Regulation 411.3.3 requires additional protection by means of an RCD with a rated residual operating current not exceeding 30mA for socket outlets rated at 20A or less. In practice, this means virtually all socket circuits in domestic installations need 30mA RCD protection.
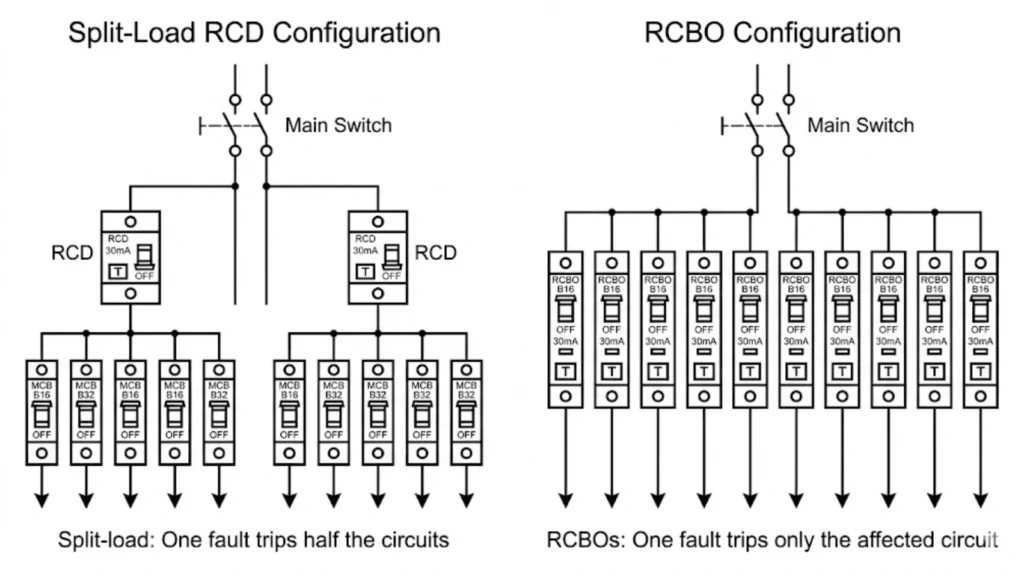
Modern consumer units achieve this either through:
- Split-load boards with RCDs protecting groups of circuits
- High-integrity boards with RCBOs (individual RCD + circuit breaker combined) for each circuit
The RCBO approach costs more initially but provides better discrimination. When one circuit faults, only that circuit trips rather than losing half your house. For properties where power loss affects vulnerable occupants or critical equipment, RCBOs are worth the additional £30-£50 per circuit premium.
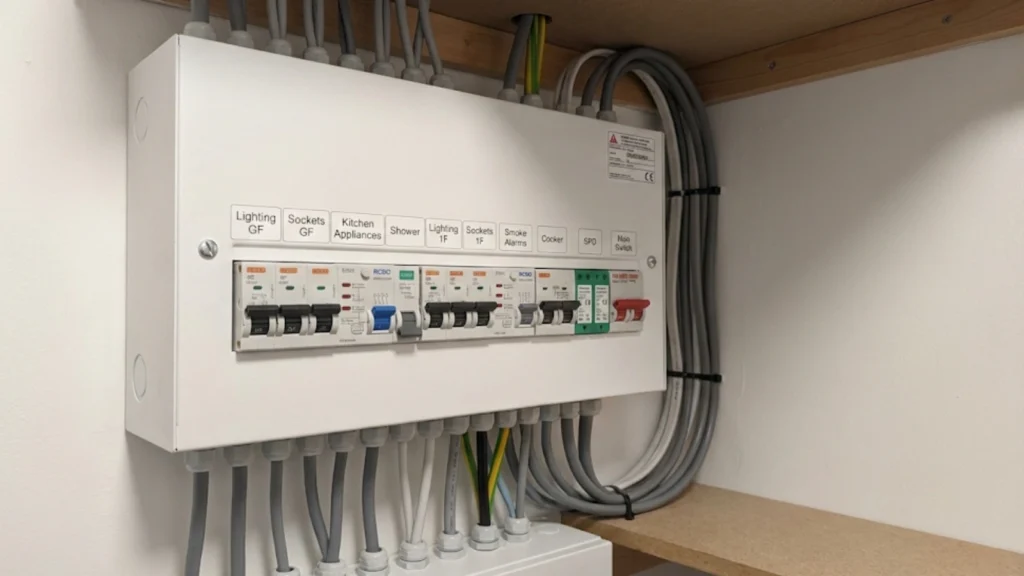
Non-combustible enclosures (metal consumer units)
Since 1st January 2016 (Amendment 3 to the 17th Edition), consumer units in domestic premises must be enclosed in non-combustible material or installed within a non-combustible enclosure. In practice, this means steel consumer units replaced the plastic ones that were standard previously.
This change responded to evidence that faults within consumer units could ignite plastic enclosures, allowing fire to spread before occupants detected it. Metal enclosures contain the fire, providing crucial extra time for detection and escape.
If you’re replacing a plastic consumer unit, the new one must be metal. This isn’t negotiable under current standards.
Surge protection devices (SPDs)
Regulation 443.4 requires surge protective devices in certain circumstances to limit transient overvoltages. While not universally mandatory, they’re required unless a risk assessment justifies their omission.
In practice, most electricians install SPDs in new consumer units as standard because:
- The cost is relatively low (£80-£150)
- Justifying their omission via formal risk assessment takes longer than just fitting them
- They protect expensive electronics from voltage spikes caused by lightning strikes or grid switching
SPDs don’t prevent direct lightning strikes, but they do protect against the voltage surges that propagate through the electricity network when lightning strikes nearby infrastructure.
Arc fault detection devices (AFDDs)
Amendment 2 to BS 7671:2018 introduced requirements for AFDDs in certain higher-risk situations, particularly single-dwelling units like student accommodation or houses of multiple occupation. For standard domestic properties, they’re not yet mandatory but are increasingly recommended.
AFDDs detect dangerous arcing (loose connections, damaged cables, deteriorating contacts) that can cause fires. They’re more sophisticated than standard MCBs and cost significantly more (£80-£120 per device), which is why their adoption in standard domestic consumer units remains limited despite their safety benefits.
The cumulative cost of modern standards
A basic 10-way split-load consumer unit with RCDs might cost £150-£250. The same board with RCBOs on all circuits costs £450-£650. Add SPD (£80-£150) and the unit alone approaches £600-£800 before any labor or additional work.
This is why consumer unit replacement quotes range from £600-£1,500+ depending on specification. The cheapest option meets minimum standards. Higher specifications provide better protection and convenience but increase costs accordingly.
Modern standards exist because electrical incidents killed people and destroyed property. The requirements aren’t arbitrary bureaucracy. They’re engineering solutions to documented safety problems. Compliance costs money, but the protection they provide is the reason UK electrical installations are among the safest globally.
Consideration 4: Who Can Legally Do This Work (And Why It Matters)
Consumer unit replacement is notifiable work under Part P of the Building Regulations in England and Wales. This creates legal requirements about who can perform the work and how it must be certified.
Part P notification requirements
Any person replacing a consumer unit must either:
- Be registered with a competent person scheme (NICEIC, NAPIT, ELECSA, etc.), in which case they self-certify the work and notify Building Control automatically, or
- Submit a Building Notice to local Building Control before starting work and pay for independent inspection after completion (typically £300-£500)
DIY consumer unit replacement is legal in the sense that you won’t be prosecuted for doing it yourself. However, you must notify Building Control in advance, pay for their inspection, and prove competence to their satisfaction. Most DIY attempts fail this stage because Building Control inspectors require proper testing with calibrated equipment and comprehensive certification that DIYers cannot provide.
The certification requirements
Every consumer unit replacement must be accompanied by an Electrical Installation Certificate (EIC) that documents:
- Full circuit testing results (insulation resistance, earth fault loop impedance, RCD trip times, polarity, continuity)
- Verification that the installation complies with BS 7671
- Details of the protective devices installed and their ratings
- Confirmation of earthing and bonding arrangements
- Any departures from BS 7671 with justification
- Schedules of test results for every circuit
Producing this certificate requires calibrated test equipment (£2,000-£5,000+ for a proper multifunction tester), knowledge of testing procedures, and understanding of how to interpret results. This is why professional electricians charge what they do, and why DIY attempts rarely result in compliant installations.
"People watch YouTube videos showing consumer unit swaps and think it's simple. What they don't see is the testing equipment that costs thousands, the verification process that takes hours, the legal certification requirements, or the years of experience needed to interpret test results and identify hidden faults. DIY electrical work kills people. This isn't hyperbole, it's HSE statistics."
Joshua Jarvis, Placement Manager
Insurance and liability implications
If you DIY your consumer unit replacement (or hire an unregistered person to do it), several problems arise:
Your home insurance may be invalidated if the work wasn’t certified by a competent person. If a fire or electrical incident occurs and investigators discover non-compliant electrical work, insurers can refuse payout.
Selling your property becomes complicated. Solicitors conducting conveyancing will ask for Building Regulation compliance certificates. If you cannot provide them, buyers either withdraw or demand significant price reductions to cover the cost of rectification.
Legal liability remains with you indefinitely. If someone suffers electric shock or property damage due to faulty electrical work you performed or commissioned from an unqualified person, you’re legally responsible. The “I didn’t know” defense doesn’t work when regulations clearly require competent person certification.
What “competent” actually means
Competence under the Electricity at Work Regulations 1989 and BS 7671 isn’t about holding specific qualifications. It’s about possessing sufficient knowledge, training, and experience to prevent danger and perform work safely.
In practice, this means:
- Understanding BS 7671 thoroughly
- Knowing how to select and install protective devices correctly
- Being able to perform all required tests with proper equipment
- Understanding fault paths, protective bonding, and earthing principles
- Recognizing when additional work is needed before certification is possible
Someone who learned electrical work 20 years ago but hasn’t kept current with regulation changes isn’t competent. Someone who took a short course but has never actually commissioned a consumer unit under supervision isn’t competent. Competence combines education, experience, and currency with current standards.
Understanding electrician wage standards helps contextualize why qualified electricians with proper certification charge professional rates for work that carries legal responsibilities and requires expensive equipment, insurance, and ongoing professional development.
The cost of using registered electricians vs “cheap” alternatives
Registered electrician with competent person scheme membership: £800-£1,500 for consumer unit replacement including certification and notification.
Unregistered person plus Building Control inspection: £400-£600 labor plus £300-£500 Building Control fee, assuming work passes inspection (it often doesn’t, requiring costly rectification).
DIY with Building Control notification: £200-£400 materials plus £300-£500 Building Control fee, plus risk of failed inspection, insurance issues, and future sale complications.
The “expensive” option is registered electricians. The “cheap” option often ends up costing more once complications emerge, and carries significantly higher risk of non-compliance, insurance problems, and safety issues.
What Homeowners and Landlords Actually Need to Know
If you’re commissioning consumer unit replacement work, here’s the practical guidance that helps you make informed decisions and avoid costly surprises.
Get specific quotes, not ballpark estimates
A proper quote for consumer unit replacement should include:
- Full circuit testing before work begins
- Consumer unit specification (number of ways, RCD or RCBO configuration, SPD inclusion)
- Any earthing and bonding work required to meet BS 7671
- Certification and Building Regulation notification
- Labor time estimate with daily rate or fixed price
- Warranty on work performed
If a quote just says “fit new consumer unit, £500,” it’s almost certainly missing critical components. Either the electrician hasn’t assessed the installation properly (meaning costs will escalate once they discover issues), or they’re planning to skip required testing and certification (meaning the work won’t be compliant).
Ask about potential additional costs
Responsible electricians will caveat their quotes with language like “subject to test results” or “assuming circuits are in satisfactory condition.” This isn’t them trying to con you. It’s honest acknowledgment that they cannot know what’s hidden in your walls until testing happens.
Ask specifically:
- What happens if circuit testing reveals faults?
- Is remedial work included in the quote or charged separately?
- What’s the hourly rate for additional work beyond the base quote?
- How much notice will I get before additional costs are incurred?
Get this in writing before work starts. It prevents arguments later when the electrician discovers your 1960s lighting circuits have compromised insulation requiring rewiring.
Landlord-specific considerations
If you’re a landlord replacing a consumer unit in a rental property:
Timing: Schedule work between tenancies if possible. Consumer unit replacement requires several hours without power, which is disruptive for occupied properties.
EICR alignment: Many landlords commission consumer unit replacement after an EICR identifies the old unit as a C2 (potentially dangerous). Ensure the same electrician or firm does both jobs to maintain continuity and avoid disputes about what needs addressing.
Certification: You must provide the Electrical Installation Certificate to tenants and keep copies for your records. This proves compliance with your legal duties under the Electrical Safety Standards in the Private Rented Sector (England) Regulations 2020.
Ongoing maintenance: Once replaced, the new consumer unit needs minimal maintenance, but it should be inspected as part of your regular EICR cycle (every 5 years for rental properties, or at change of tenancy).
Red flags that indicate poor practice
Electrician won’t provide written quote: Always get it in writing with specification details.
Quote doesn’t mention testing or certification: Legal requirements, not optional extras.
Pressure to decide immediately: Professional electricians don’t use high-pressure sales tactics.
Significantly cheaper than other quotes without clear explanation: Either cutting corners on specification, planning to skip testing, or using inferior materials.
Cannot provide proof of competent person scheme registration: Ask for registration number and verify it on the scheme’s website.
Unwilling to explain what work involves: Competent electricians can explain their work in terms homeowners understand.
Timeline expectations
Simple consumer unit replacement (modern property, circuits in good condition, no additional work required): 4-6 hours including testing.
Standard replacement (older property, some remedial bonding or minor circuit work): 1-2 days.
Complex replacement (significant earthing upgrades, multiple circuit issues, accessibility challenges): 2-4 days potentially.
Allow flexibility in your schedule. Electricians cannot predict with certainty what testing will reveal until they start. A job estimated at one day might extend to two if unexpected issues emerge.
Consumer unit replacement protects your home and family from electrical dangers that old-style fuse boxes cannot detect. But protection only works when the entire electrical system meets the standards the new unit requires. Cutting corners on testing, using unregistered electricians to save money, or attempting DIY installation without proper equipment and knowledge creates situations where the new consumer unit cannot fulfill its safety function.
Call us on 0330 822 5337 to discuss consumer unit replacement requirements and the training pathways that produce electricians capable of performing this work to BS 7671 standards. Whether you’re a homeowner seeking to understand what proper consumer unit replacement involves, or you’re considering training to become an electrician capable of undertaking this regulated work, we’ll explain the technical knowledge, testing requirements, and certification standards that ensure electrical safety in UK homes. No hype. No shortcuts. Just practical guidance on what competent consumer unit replacement actually requires.
FAQs
Why isn’t replacing a consumer unit just a straightforward swap of the old fuse box for a new one?
Replacing a consumer unit is not a like-for-like swap because the electrician becomes responsible for confirming the entire installation remains safe once modern protection is fitted. Existing wiring, circuits, and accessories must be assessed to ensure they can operate correctly with today’s circuit breakers and RCDs.
Older systems may contain hidden issues such as degraded insulation, undersized cables, or poor connections that previously worked with rewireable fuses but are unsafe by modern standards. Supply characteristics, earthing arrangements, and maximum demand must also be checked. What starts as a “replacement” can uncover remedial work that is necessary to prevent nuisance tripping, shock risk, or fire.
What checks and testing must be carried out before a new consumer unit can be installed?
Before installation, electricians must carry out both visual inspections and electrical testing to confirm the system is suitable.
This typically includes:
- Visual checks of wiring, sockets, switches, and accessories
- Insulation resistance testing to detect leakage or breakdown
- Continuity testing of protective conductors (earthing)
- Polarity checks to confirm correct connections
- Earth fault loop impedance testing to verify fault protection
- Prospective fault current testing
- Assessment of main earthing and bonding
These checks identify faults that could cause the new unit to trip or operate unsafely. Identifying issues early reduces the risk of failures after installation and avoids unexpected hazards for the homeowner.
How does the condition of existing circuits affect whether a consumer unit replacement is possible?
The condition of existing circuits determines whether a replacement can proceed without additional work. Circuits with brittle insulation, undersized cables, loose connections, or mixed wiring types may fail pre-installation tests.
Modern protective devices are more sensitive, so circuits that previously appeared “fine” may become unreliable or unsafe. In older properties, electricians often find issues such as shared neutrals, undersized rings, or circuits needing separation.
If several circuits are defective, the work may escalate to partial or full rewiring. While this increases cost and time, addressing these issues ensures the new consumer unit operates safely and reliably over the long term.
Why do modern RCDs and RCBOs often reveal faults that never showed up before?
Modern RCDs and RCBOs detect small earth leakage currents that older fuses and breakers were never designed to see. These devices respond to insulation damage, moisture ingress, appliance faults, or deteriorated wiring.
Older systems relied on overcurrent protection only, so minor leakage went unnoticed. Once sensitive protection is installed, pre-existing faults can cause unexpected tripping.
Although inconvenient at first, this is a safety improvement. It highlights issues that could otherwise lead to electric shock or fire. Faults uncovered after installation usually require targeted repairs rather than major rewiring.
How important are earthing and bonding when fitting a new consumer unit?
Earthing and bonding are critical to electrical safety and are a key focus during consumer unit replacement. Earthing provides a safe path for fault current, allowing protective devices to disconnect power quickly. Bonding ensures metal parts like pipes and radiators remain at the same electrical potential during faults.
In older properties, bonding is often missing or inadequate. With modern protective devices, poor bonding can create dangerous voltage differences.
Electricians must verify and upgrade earthing and bonding as needed. Without this, the installation may be unsafe and non-compliant. For homeowners, proper earthing and bonding significantly reduce shock risk and improve system reliability.
What current BS 7671 requirements apply to consumer unit replacements in domestic properties?
Modern consumer unit replacements must meet current safety requirements, including:
- Non-combustible (metal) enclosures
- RCD or RCBO protection on all circuits
- Adequate circuit design to handle demand
- Verified earthing and bonding
- Consideration of surge protection devices
- Enhanced protection in special locations
- Full testing and certification
While existing wiring is not required to be upgraded retrospectively in all cases, it must be safe to remain in service. If it does not meet minimum safety requirements, upgrades may be necessary before the new unit can be energised.
Are surge protection devices and arc fault detection devices mandatory in a new consumer unit?
Surge protection devices (SPDs) are generally required unless a documented risk assessment shows they are unnecessary. They protect against voltage spikes from lightning and network switching.
Arc fault detection devices (AFDDs) are mandatory only in specific higher-risk situations, such as certain socket circuits in sleeping accommodation or buildings with elevated fire risk. They are not required for every domestic circuit.
Many electricians recommend these devices for added protection, particularly in older homes. If omitted, the decision must be recorded. Homeowners should discuss cost, risk, and suitability with their electrician.
Who is legally allowed to replace a consumer unit, and why does Part P notification matter?
Consumer unit replacement is notifiable work under Building Regulations. It must be carried out by a competent electrician who can either self-certify or notify the local authority.
Registered electricians handle Part P notification and issue certification automatically. Unregistered work risks invalidating insurance, delaying property sales, or requiring costly inspections.
For landlords, compliance is essential for tenant safety and legal obligations. Using a registered electrician ensures the work is lawful, documented, and recognised.
Why do consumer unit replacement quotes vary so widely in price?
Quotes vary because properties differ significantly in condition and complexity. Factors include:
- Amount of remedial work required
- Quality and specification of the consumer unit
- Inclusion of SPDs or AFDDs
- Regional labour rates
- Property age and access difficulty
- Testing, certification, and warranties included
Some quotes cover only the unit swap, while others include fault rectification and compliance upgrades. Comparing detailed breakdowns is more useful than comparing headline prices.
What should homeowners and landlords ask an electrician before agreeing to a consumer unit replacement?
Before agreeing, ask:
- Are you registered to self-certify this work?
- What testing is included before installation?
- What happens if faults are found?
- What type of consumer unit and protection devices are included?
- Will surge protection or AFDDs be fitted?
- What certification and documentation will I receive?
- How long will power be off?
- Are warranties provided?
- Is Part P notification included?
Clear answers help avoid surprises, ensure compliance, and confirm the work will be safe, legal, and appropriate for the property.
References
- IET Wiring Regulations BS 7671:2018+A2:2022 – https://electrical.theiet.org/bs-7671-18th-edition-wiring-regulations/
- HSE: Electricity at Work Regulations 1989 – https://www.hse.gov.uk/pubns/books/hsr25.htm
- Electrical Safety First: Part P Building Regulations – https://www.electricalsafetyfirst.org.uk/guidance/professional-resources/part-p/
- GOV.UK: Electrical Safety Standards in Private Rented Sector – https://www.gov.uk/government/publications/electrical-safety-standards-in-the-private-and-social-rented-sectors-guidance
- NICEIC: Consumer Units and Fuse Boxes – https://niceic.com/householders/electrical-services/consumer-units-and-fuse-boxes
- IET: Consumer Unit Guidance – https://electrical.theiet.org/courses-resources-and-career-for-electrical-professionals/free-resources/consumer-guidance/consumer-units/
- Building Regulations Approved Document P – https://www.gov.uk/government/publications/electrical-safety-approved-document-p
- Electrical Safety First: Best Practice Guide (Consumer Units) – https://www.electricalsafetyfirst.org.uk/media/uetp0drg/best-practice-guide-1-issue-5.pdf
Note on Accuracy and Updates
Last reviewed: 10 February 2026. This article is maintained and updated as BS 7671 amendments, Building Regulations, and electrical safety standards change. Information reflects current Amendment 2 requirements to BS 7671:2018 and Part P notification procedures in England and Wales. Scottish and Northern Irish regulations differ in notification processes. For consumer unit work specific to your property, commission an EICR from a registered electrician who can assess your installation’s actual condition and provide accurate quotes based on testing results.
